Use your own web address · Blacknight
Use your Blacknight web address for your ChooseLocal page
No technical knowledge needed. Follow the pictures, one click at a time. It takes about 10 minutes.
What you're doing, in plain words
Your web address works like a signpost. Right now it points at your old website, or at nothing. You're going to turn the signpost so it points at your ChooseLocal page. Your page doesn't change, and your email keeps working.
You'll need
- About 10 minutes.
- The email you use for ChooseLocal.
- The login for the company you bought your address from.
Rather not do it yourself? Email team@gowtom.tech with your address and we'll do it with you.
Part 1 · 2 minutes
In ChooseLocal
Did we build your site for you? Then we've already done this part. Skip to Part 2.
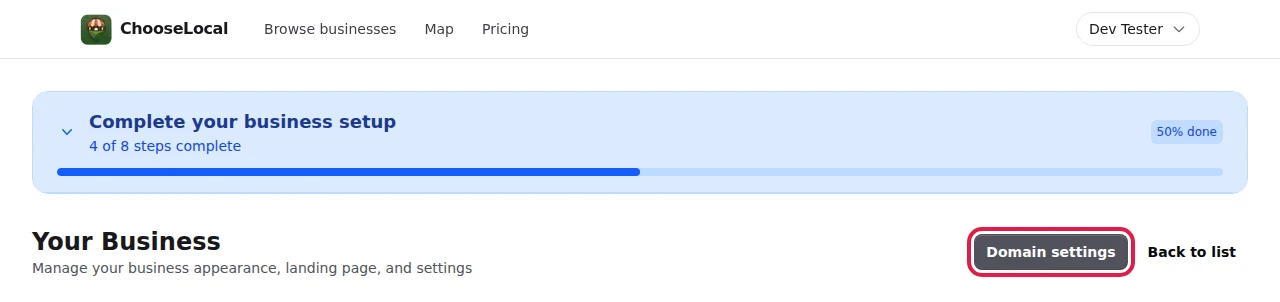
Step 1: Open Domain settings
Sign in at chooselocal.ie. Open your business. Click Domain settings.
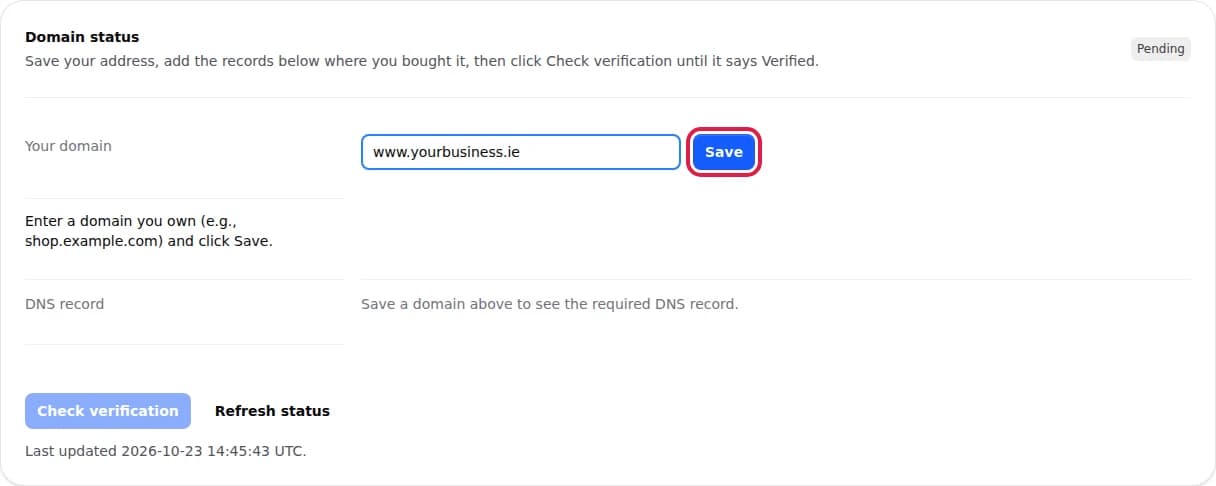
Step 2: Type your address and click Save
Type your address with www at the start, for example www.yourbusiness.ie. Then click Save.
Don't worry about the version without www. It will work too.
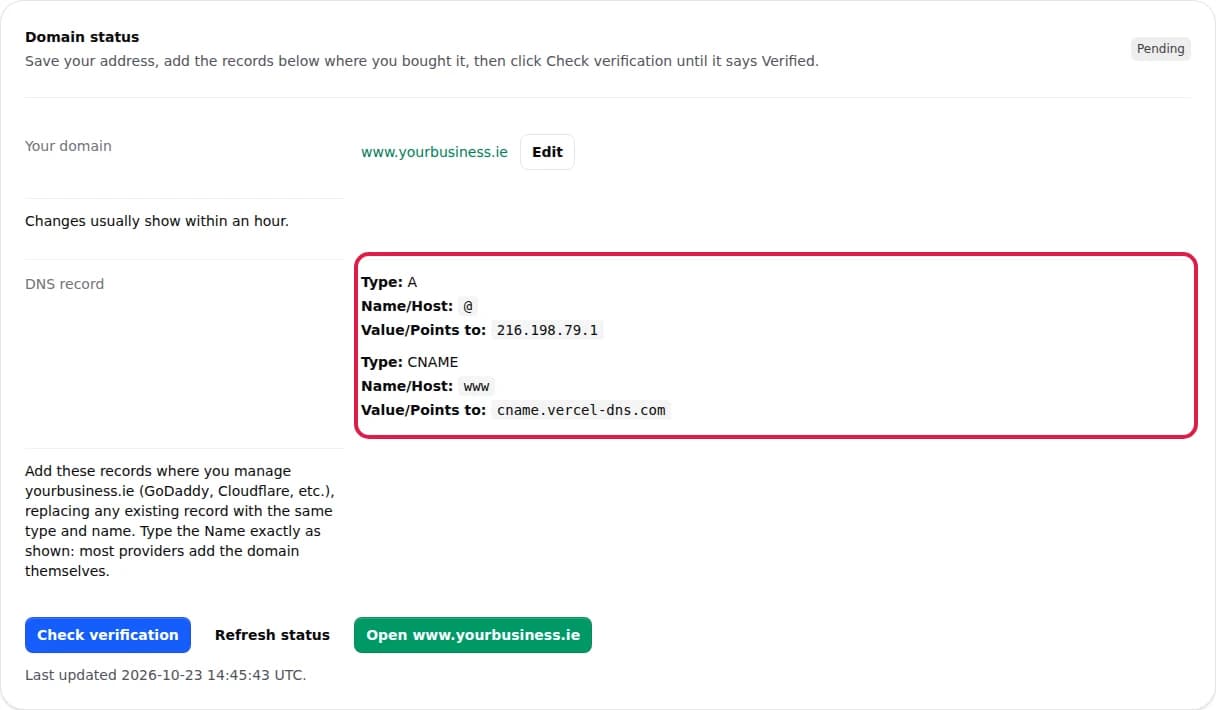
Step 3: Leave this page open
ChooseLocal now shows the rows to copy, under DNS records: usually two, sometimes one or two more marked TXT. You'll copy them in Part 2, so keep this page open in its own tab.
It says Waiting for your records. That's normal: it changes when you finish Part 3.
Part 2 · 7 minutes
In Blacknight
Only change the rows this guide shows you. Leave everything else in Blacknight as it is. Nothing changes until you click Confirm, so you can look around safely.
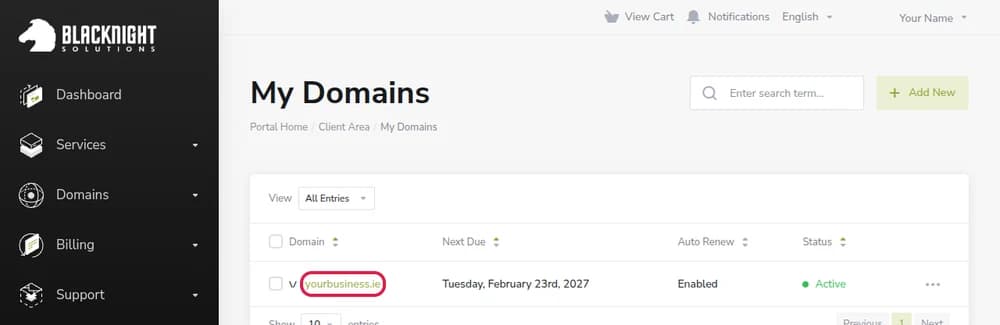
Step 4: Open your address in Blacknight
Open a new tab. Sign in at cp.blacknighthosting.com. Click Domains, then My Domains. Click your address.
You sign in at cp.blacknight.com instead, or your address isn't in the list? See Older Blacknight accounts below before you change anything.
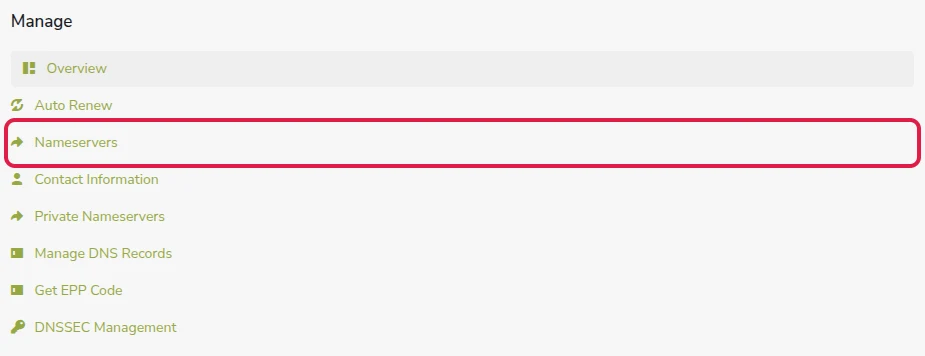
Step 5: Click Nameservers
Scroll down to the box called Manage. Click Nameservers.
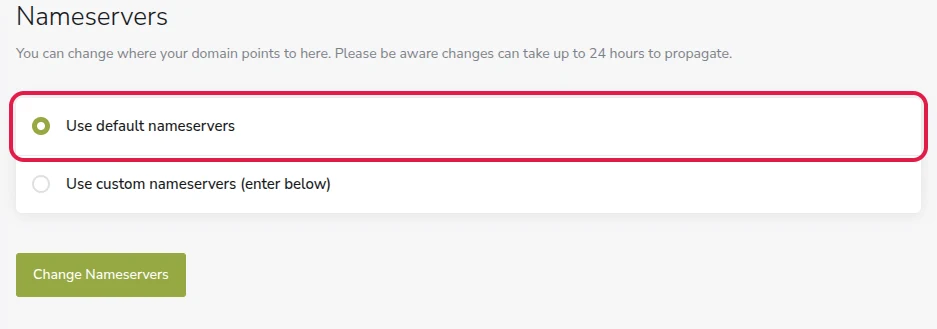
Step 6: Check it says Use default nameservers
Use default nameservers should be ticked. That means Blacknight keeps your settings, so the next steps will work. Don't click Change Nameservers.
Use custom nameservers is ticked instead? Stop here and email us. It means your settings are kept with another company, and we'll tell you where.
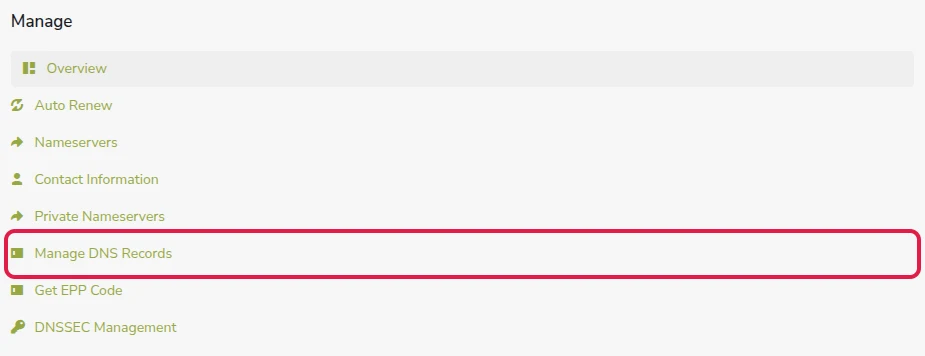
Step 7: Click Manage DNS Records
In the same Manage box, click Manage DNS Records. This is the list of settings that say where your address goes. Scroll down to Edit Zone.
Step 8: Find the A row
Look for the row with @ under Name and A under Type (@ means your address on its own). Also look for a row with www under Name. These are the only rows you'll change.
Leave the NS rows alone: they're Blacknight's own. MX rows are your email: leave those alone too, and your email keeps working.
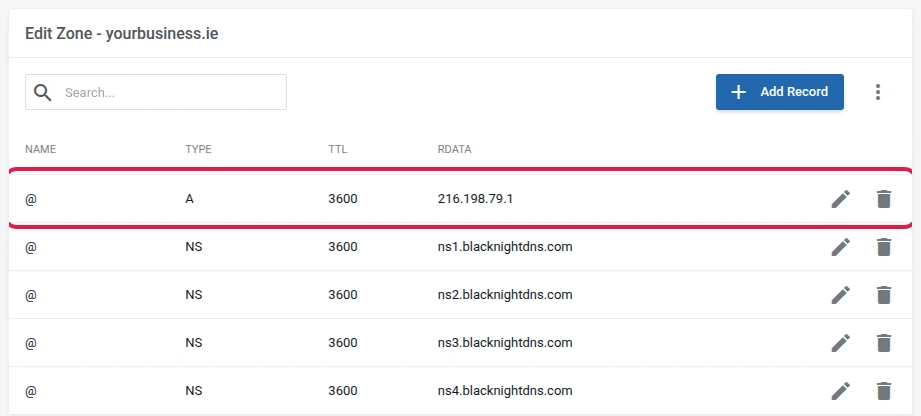
Step 9: Change the A row
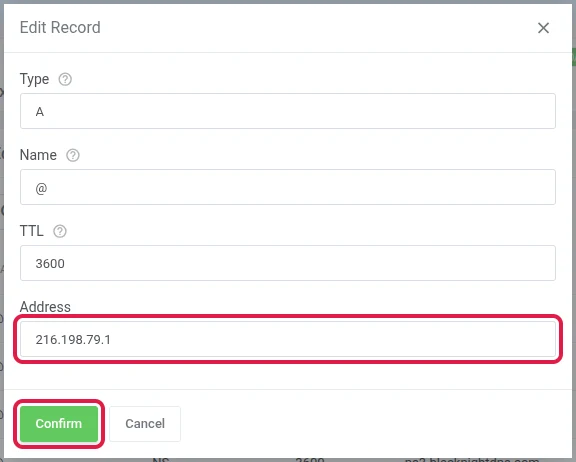
Click the pencil at the end of the @ A row. Click into the Address box and delete what's there. Paste this instead:
216.198.79.1Click Confirm.
No @ A row? Click Add Record, pick A as the Type, type @ in Name, paste the value above in Address, and click Confirm. Two @ A rows? Delete the second one with its bin icon. A row with @ under Name and AAAA under Type? Delete that too: it sends some visitors to your old website. Already says 216.198.79.1? Leave it.
Step 10: Add the www row
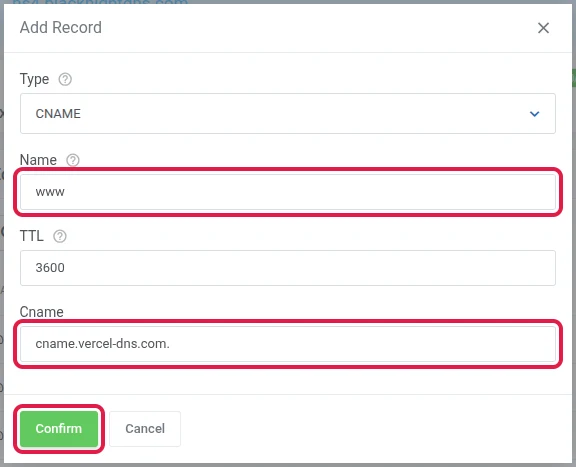
Click Add Record. For Type, pick CNAME. Type www in Name: just www. In the Cname box, paste this, with the full stop at the end:
cname.vercel-dns.com.Click Confirm.
Don't type your full address in the Name box. Blacknight adds it for you. Already have a www row with CNAME under Type? Click its pencil and change the Cname box instead. Got a www row with A under Type? Delete it with its bin icon first, then add this one.
Step 11: Only if ChooseLocal showed TXT rows: add each one
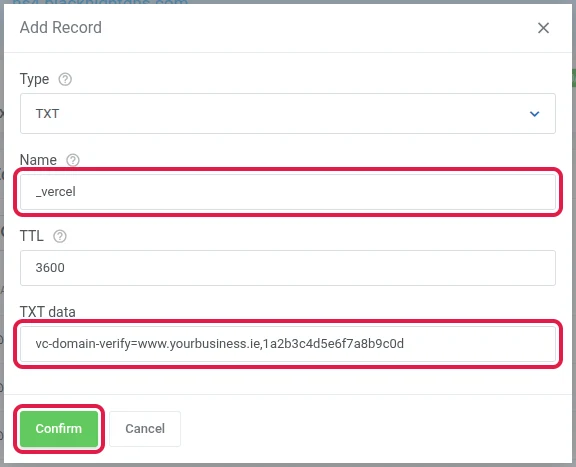
Most people skip this. If step 3 showed one or two extra rows with TXT under Type, then for each of them click Add Record, pick TXT, and copy its Name (usually _vercel) and Value from ChooseLocal exactly. The Value goes in TXT data. Click Confirm.
Part 3 · 1 minute
Back in ChooseLocal
Step 12: Click Check verification
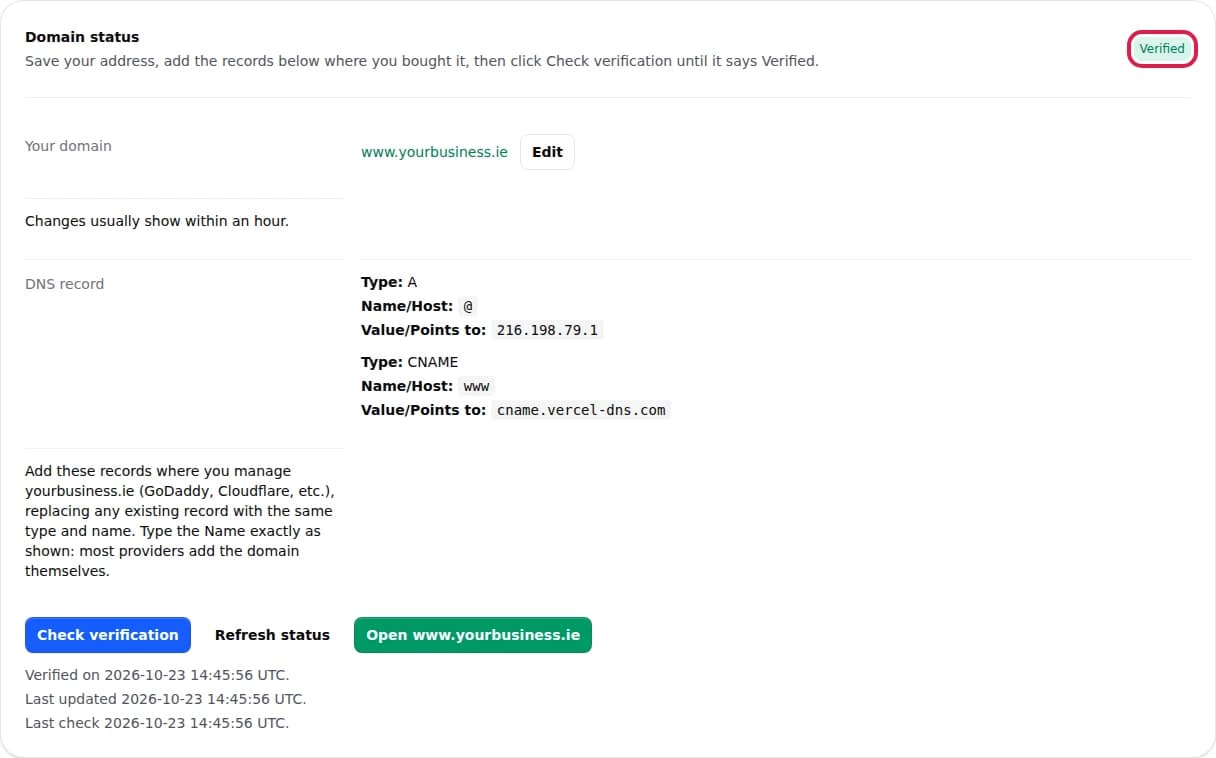
Go back to the ChooseLocal tab. Click Check verification. When you see a green Live, you're done.
Not Live yet? That's normal for a while. Try again in 15 minutes; it nearly always works within an hour. The two questions on the card tell you what is still missing: whether the address is confirmed as yours, and whether it points to your page.
What happens next
- Your page shows on your address within an hour, often within minutes.
- Both yourbusiness.ie and www.yourbusiness.ie open your page.
- In the first few minutes your browser may warn that the page is "not secure". That goes away by itself.
- Your email keeps working. You didn't touch the settings it uses.
- Google keeps showing your business, and your Google reviews stay exactly as they are.
Older Blacknight accounts
Some older addresses are still managed at cp.blacknight.com, Blacknight's previous control panel. It looks different from the pictures above, and to change these settings there Blacknight sometimes asks you to remove the hosting first, which can delete your website files or your email.
Don't remove any hosting there. Email team@gowtom.tech with your address instead, and we'll do it with you so nothing else is lost.
Not working after an hour?
- Still seeing your old website? Check there's only one @ A row, and no @ AAAA row.
- Check the www row's Cname ends with a full stop, and that step 6 still says Use default nameservers.
- Check the two values again. The Copy buttons above avoid typing mistakes.
- Try your phone with Wi-Fi turned off. Your computer may be remembering the old website.
Still stuck? Email team@gowtom.tech with your address. We'll sort it out with you.